Step-by-Step Guide to Installing a Backup Camera in Your Car

Ever tried backing out of a tight parking spot and felt your heart skip because there was a cyclist, a child, or even another car that appeared out of nowhere? That split second of panic is exactly why you need a .
It's not a luxury add-on, but a must-have for safety essentials. If your car doesn't have one, and you are looking to install it by yourself without overcomplicating the process, here is the guide for you to follow.
With the right tools and patience, you can ensure to follow practical advice while avoiding basic mistakes for a safety upgrade.
What Is The ‘Right System’ For Your Car?
The first major decision is to choose between wired and wireless, and here is what to understand :
| Key Factors | Wired Backup Camera | Wireless Backup Camera |
|---|---|---|
| Signal Stability | Offers an excellent stability that needs minimal interface | It's slightly more prone to interference depending on your environment |
| Latency | Very low, almost offers real-time | Slightly higher, as can be noticed in some situations |
| Effort in Installation | Requires routing for a long video cable through your car | Much hassle-free especially since you need no long cable |
| Ideal Use Cases | Daily drivers, performance cars need a reliable OEM–like operation or work vehicles. | Gives a quick installation, RVs, leased cars, fleet, or needs faster rollouts |
Bottom Line: If you are looking for a fast and tidy install that has minimal panels removed, go with a wireless backup camera, especially for a digital kit and robust pairing as well as encryption.
Or if you want OEM-like reliability without the need to run a video cable, prefer a wired camera for your car.
Besides this, make sure your camera includes :
- License plate frame or bolt-on for fastest installation with minimal drilling and a centered view.
- Lip or flush mount offers a clean look in the tailgate handle, and trunk garnish requires drilling a 3/4 hole.
- Look for bullet cameras that are flexible in placement, offering an adjustable angle and a secure bracket.
- RV and trailer cameras offer weather-seated housing with a stronger antenna, pairing often with larger monitors for better visibility.
Next is to choose options from the monitor and display, i.e.:
- Look for factory screen integration to add the cleanest result, requiring an interface module for the vehicle without native video input.
- Standalone dash monitors offering flexible positioning are especially good for fleet vehicles and RVs.
- standalone dash monitors offer flexible positioning and are especially good for fleet vehicles and RVs.
- A head unit with video input has straightforward options if you prefer radio support or reverse camera input.
- Use wire loom or split tubing where cable passes hinge points and sharp metals.
Read More Factors To Consider When Choosing the Right Backup Camera
Tools & Materials You Will Need For Installation
To start your installation process, make sure you have these tools ready.
- Screwdrivers
- Trim removal tools (it's for safety, opening interior panels without scratches)
- Powder drill for mounting
- Drill bits (they can be metal or plastic, depending on the car’s surface)
- Socket wrench set
- Utility knife or wire stripper
- Multimeter (It's for testing voltage and confirming the power source)
- Electrical tape
- Wire stripper or crimper
- Heat shrink tubing
- Soldering iron or solder
- Zip ties or cable clips
- Protective loom tubing
- Silicon sealant
- Backup camera kit
Also Read: 28 Terms To Know Before You Invest In A Safety Camera System
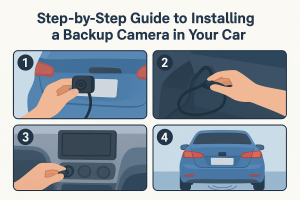
Step-by-Step Installation For Your Backup Camera
Here are the steps you need to follow for a professional-level installation.
Step 1: Start by Planning Your Cable Route
To make the installation process easier, start by planning the path for your cables. This follows from your rear camera to the dashboard display.
The pre-planning reduces the guesswork, avoiding any damage or confusion in mid installation.
- Identify the safe routes along undercarpets, vehicle panels, or behind tim where your cable will be hidden and stay protected
- Avoid putting your cables near heat sources such as exhaust systems.
- If you have a larger vehicle that needs longer cable runs, make sure there is no tension in the cable length.
Pro Tip: Take pictures before you start so you have a clear idea and avoid future confusion.
Step 2: Get A Right Mounting For the Camera
Choose the correct mounting location as it's essential for optimizing camera performance.
Most cameras are mounted in three spots, i.e., license plate area, trunk handle, and bumper flush mount.
To mount your camera, start with:
- Temporarily position your camera to check the correct alignment on the monitor.
- Look for the clear, level view and a bit of your bumper for depth reference.
Once you have that, mount your camera where you want, for example:
- License Plate Frame: Remove the plate first and then fit the bracket and remote.
- Flush Mount: Measure correctly before your drill, and also project bare metal edges using a rust inhibitor after the cutting.
Pro Tip:Take your time to test each and every angle with live video before you tighten everything.
Step 3: Power Your Camera
Most installations you find draw power from reverse light circuits. It helps the camera activate when you are shifting into revers
- Do use a multimeter for identifying the positive wire.
- Also then splice carefully using crimp connectors or solder with heat shrink tubing.
- It's better to avoid quick splice taps as they often fail for a long time.
- Some installers also prefer powering the camera instead of the accessory circuit, offering continuous power.
- In this setup, the display only shows the feed if it gets triggered by a reverse signal.
- It makes it ideal if you want to monitor a trailer for rear traffic or a trailer hitch while driving.
Pro Tip: Ground your system to clean and bare metal for closing where the camera is mounted.
Step 4: Wiring The Camera Setup
If you are opting for a wired system, go with:
- Route the video cable from your rear to the dash or mirror monitor. It's better to follow the existing harness path if it's possible.
- Use wire loom or split tubing where cable passes hinge points and sharp metals.
- Connect the video cable to the display, or if your monitor needs a reverse trigger wire, go for that too.
- Connect the video cable to the display, or if your monitor needs a reverse trigger wire, connect that too.
- Once you connect, test before you replace trim panels.
If you are going for a wireless backup camera, go with:
- Power the camera and use the transmitter from your reverse light.
- Mount the receiver close to your monitor, as it's ideal to put it behind the dashboard or mirror.
- Pair these two units and then check for a stable video signal, and then finalize the placement.
- Keep in mind systems like an RV backup camera often require a transmitter that is much stronger, external antennas to overcome the length of the vehicle.
Step 5: Integrate Your Displaces With the System
Backup cameras can be compatible with monitor types such as:
- Factory infotainment screens are one of the cleanest options, but they need an interface module.
- Mirror-mounted display for ease of use without shifting your line of sight
- Standalone dash monitor to add flexibility for larger vehicles and RVs.
Pro Tip: When connecting your system to factory screens, make sure you confirm the video standard to avoid any compatibility issues.
How To Deal With Common Pitfalls During Installation?
Even with the right tools and following the step-by-step installation, there are some common challenges that often come up.
Knowing how you can handle them upfront helps save you time, frustration, and chances of rework.
| Common Pitfalls | Why It Happens | How To Fix |
|---|---|---|
| Video signals are flickering or loose | RCA plugs might not be seated, or cables routed near high-current wires | Re-seat your connectors firmly and keep the cable away from the alternator or illumination wiring. |
| Images are showing upside down or mirror wrong | The camera may have default settings that are not adjusted | Switch to mirror or normal wiring, or adjust the display setting. |
| Images are blurry or have poor night vision | The lens might be dirty, wrong angle | Make sure to clean and reangle the lens. |
| The camera is not powering on | The reverse light circuit is weak, or poor ground | Test using a multimeter if you use LED reverse lights, connect accessory power, and run the reverse trigger wire |
| Wires are hanging or getting pinched | Due to improper securing during the installation process | Use zip ties to keep route wires away from any sharp edges, heat sources, etc |
Must Read: 7 Installation Tips For Any Backup Camera System
Conclusion
Installing a backup camera may seem like an intimidating task, but once you break it down step by step, it's a straightforward process.
With the right tools, understanding in steps, proper testing, and careful writing can be far less stressful and smoother.
Professional or not, DIY installation saves you cost and stress, making you feel confident giving an exact blueprint of how to set up your system.
We at Rear View Safety ensure you provide a backup camera that is equipped with the latest technology and features so you stay protected while you are on the road.