A Comprehensive Guide On Routine Maintenance For Vehicle Camera Systems
When it comes to essential safety and making driving more convenient, vehicle camera systems are a must-have. It's especially needed for reversing, parking, and maneuvering in spaces that are too limited or tight.
But like all electronics that are exposed to elements like weather or the outside, it requires maintenance to ensure its effectiveness.
However, to ensure you have a complete guide on how you can take care of the vehicle camera system, here are detailed ways to follow.
Why Is Routine Maintenance Needed?
Vehicle camera systems are similar to any other automatic electronics that are prone to wear and environmental exposure.
Having routine checks ensures you handle even small issues before they lead to any risks or compromising safety.
The major key reasons why it's needed include :
- One of the major reasons is to have safety assurance, especially in backup cameras, to reduce the issue with visibility or collision-like risks.
- Helps in preventing premature wear and failure of your equipment, like cameras, wiring, or monitors.
- Weather protection helps in boosting the performance of the equipment during conditions like low light, rain, or snow.
- Early detection can help in saving costs and prevent expenses or replacements.
Why AI Dash Cams Are a Must-Have for Modern Fleets
List Of Common Components That Need Maintenance In Vehicle Camera Systems
- Camera Lens: These are the eyes of the system, so having dirt, moisture, or any scratches reduces the quality of image quality. The backup and RV cameras are particularly prone to weather effects or road grime.
- Wiring and Connectors: The next common component is the monitor display, located either on the dashboard or integrated into your rearview mirror. From displaying a visual feed, which needs maintenance from dust, pixel fading, or connectivity issues.
- Power Supply: This includes the connections, fuses, or batteries of your vehicle's electrical systems, which can lead to total system failure in case of any damage.
- Mounting Hardware: Having brackets and screws ensures you have secured the camera which may cause loosening or misaligning with a camera from vibrations and impacts.
- Storage Devices: Next is the storage device, like SD cards or internal memory for recording footage, which may fill up or corrupt over time.
- Night Vision Elements: LED or IR lights are required for modern vehicle camera systems to handle low-light aids. Having dust or damaged light can threaten the visibility especially at night.
Best Wired Backup Camera Systems for Trucks, RVs, and Trailers in 2025
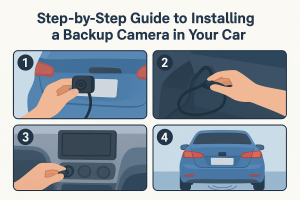
Steps For Ensuring Complete Routine Maintenance
Step 1: Start With Your Camera Lens
The camera lens is the first and one of the most integral parts to start with. The dust, rain or mud, and road debris can cause the obscure leading to blurry visuals.
How to clean:
- Get a soft microfiber cloth that can clean the surface without causing scratches or damage.
- Consider using a gentle lens cleaning solution for wiping your camera lens in a circular motion.
- In case of stubborn dirt, use water to rinse it off before you wipe it.
Tip: Do ensure that your backup camera has any anti-reflective coatings. In such cases, avoid glass cleaners or harsh chemicals, which may damage.
Step 2: Inspect All The Wires & ConnectrvionsWhen you have loose, damaged, or frayed wires, these can cause intermittent shutdowns of your whole system.
It is especially a troublesome situation for backup cameras mounted on RV doors or trunk lids, like moving parts.
How to fix it:
- Start with doing the visual inspection, making sure you are covering the cables and connectors. Look for any wear, looseness, or corrosion.
- Check the plugs as they all should be securely and firmly seated.
- In case of any exposed or damaged wires, get professional help to fix or repair them as soon as possible.
Step 3: Check Your Mounting Hardware & Camera Alignment
The vibrations from driving can impact on mounting brackets or screws to loosen.
This causes your cameras to be misaligned or shaky, which impacts on overall stability and image quality.
How to fix it:
- Inspect your mounting hardware such as brackets, clamps, and screws ensuring they are properly tight and secure.
- Wiggle the camera gently to check if there is any looseness or misalignment. If it's such a situation, adjust the angle so it is centered and marked parallel to the load for the vehicle.
Pro Tip:RV backup cameras are more exposed to exposure and vibrations, so make sure you check them more frequently. Also, use thread-locking components for screws to reduce damage and add a more secure hold.
Step 4: Look For Power Supply & Storage
Power interruptions can occur if the cables are loose or have battery-life issues. This is especially true in dash cams or vehicle camera systems, which are hardwired to your vehicle’s electrical system.
As for storage issues, if the SD cards are corrupted or full, you may end up losing important footage.
How to fix:
- Check the power connections, plus adapters, to ensure they are firmly seated.
- Inspect the cable and replace it if it's damaged or frayed to avoid any future issues.
- Regularly format your SD cards and replace them if errors happen.
Tip: To avoid last-minute panics, make sure you have a spare and ensure it is a pre-formatted SD card to get quick replacements.
What Are Common Troubleshooting Issues & Their Fixes?
With regular maintenance, there are some common troubleshooting issues you may face.
Here is the list for you to consider:
- Blurry images: Due to scratched or dirty lenses. Clean using a microfiber cloth or use a lens cover for replacing.
- Black Screens: Connection or power issues. Check if there are any fuse or wiring issues, including the power source for the camera.
- Flickering Video In Feed: Due to signal interference or loose wires. Look for all connectors to tighten. Also, keep your wiring away from high-voltage cables.
- Static or Delays: In RVS, it may be caused by a weak wireless signal. Look for a stronger signal receiver to upgrade.
- Distorted Night Vision: Damaged or dirty IR lights. Make sure to IR clean, replace LEDs if it's non-functional.
- Washed out or Glare Image: Due to sunlight or incorrect settings. Adjust your camera angle, check the settings for brightness, and contrast.
Top RV Backup Cameras of 2025: Features, Pros, and Cons
Upgrade Your Camera System For Your Vehicle System
Routine maintenance for your vehicle camera system ensures safety but also security while the vehicle is on the road.
Regular care and attention can help provide clarity and more confidence when you are behind the wheel.
By understanding each component, a simple inspection routine, and learning the basic common problems, your vehicle system remains clear, safe, and secure.
At RearViewSafety, we provide you with fast installation and the finest fleet protection. With our expertise in safe driving to suit the requirements of the industry and their standard.
Explore Our Wireless & Advanced Backup Camera System For Your Vehicle